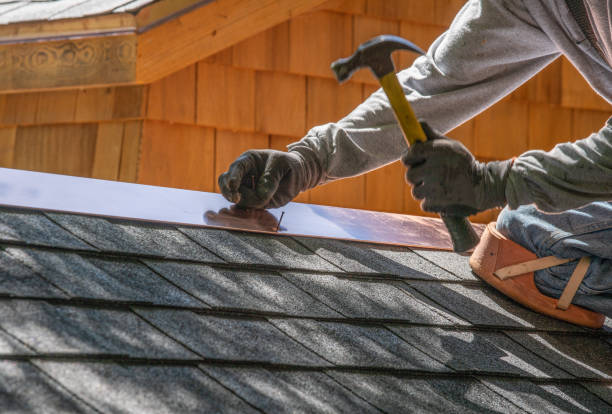
A professional roof installation or replacement is a significant investment in the safety, beauty, and longevity of your home. Whether you’re dealing with storm damage, upgrading an aging roof, or building from scratch, understanding the process helps ensure the project is executed efficiently and effectively. Below, we’ll explore key aspects that go into roof installation and replacement.
Importance of Professional Installation
Roofing is not just about placing shingles on your house – it’s a complex process requiring skill and expertise.
– Proper Installation: Preventing leaks, water damage, and structural issues by following industry standards.
– Warranty Compliance: Many roofing material manufacturers require certified professionals for warranty eligibility.
– Safety: Roofing involves risks like working at heights and handling heavy materials; trained professionals mitigate these dangers.
Investing in professional services means peace of mind knowing that your roof will be durable and secure for years.
Steps Involved in Roof Replacement
- Professionals begin by examining your existing roof to identify damage, weak areas, or structural concerns.
- They’ll check for rot, mold, or sagging that might compromise the new installation.
- The old roofing materials are carefully removed down to the decking.
- Debris is properly disposed of to leave a clean slate for installation.
- If the decking has deteriorated due to moisture or age, it will need repair or replacement before proceeding.
- A waterproof layer (underlayment) is installed over the deck to provide additional protection against leaks.
- Depending on your chosen material (e. g. , asphalt shingles, metal panels), skilled crews carefully lay them out following precise patterns for durability and aesthetics.
- Flashing is installed around chimneys, skylights, valleys, and other vulnerable areas to prevent water intrusion.
- Proper ventilation systems are added to regulate attic temperature and prevent moisture buildup.
- Thorough checks are conducted to ensure everything meets building codes and quality standards.
Key Considerations When Replacing a Roof
- Material Choice:Select materials suited for your climate and aesthetic preferences (e. g. , asphalt shingles for affordability or metal roofs for durability).
| Material | Lifespan | Cost per Square Foot (Approx.) |
| Asphalt Shingles | 20-30 years | $3-$5 |
| Metal Roofing | 40-70 years | $7-$12 |
| Tile Roofing | 50+ years | $8-$15 |
- Budget:Allocate funds not only for materials but also labor costs; ask contractors about financing options if necessary.
- Timing:Plan ahead as roofing projects can be weather-dependent; avoid scheduling during seasons prone to rain or snow.
- Permits:Ensure all required permits are obtained before work begins – reputable contractors often handle this aspect on your behalf.
Advantages of Professional Roof Replacement
- Increased lifespan of your new roofing system due to expert workmanship.
- Enhanced curb appeal adds value if you plan on selling your home.
- Improved energy efficiency thanks to modern materials designed with insulation benefits in mind.
- Reduced maintenance costs compared to poorly installed DIY jobs that could lead to recurring issues like leaks or drafts.
Hiring professionals ensures quality results while protecting one of your home’s critical components – its roof – from future problems caused by improper installation practices or overlooked details during replacement efforts.
Essential Tools and Materials Needed for a Roofing Contractor Manchester NH
When it comes to any roofing project, having the right tools and materials is essential for ensuring safety, efficiency, and a high-quality result. Whether you’re a professional roofer or a homeowner preparing for a project, assembling the appropriate tools and selecting quality materials can save time while ensuring durability. Below is an overview of the essential items you’ll need.
Tools for Roofing Projects
A successful roofing project requires specialized tools designed to handle tasks like removing old roofing materials, installing shingles, cutting metal flashing, and sealing edges.
- Roofing Hammer or Hatchet: Combines the functions of a hammer with those of a nail-pulling tool.
- Utility Knife: Ideal for cutting shingles to size.
- Chalk Line Tool: Helps achieve straight lines when laying out rows of shingles.
- Roofing Nailer: Speeds up shingle installation by driving nails efficiently.
- Extension Ladder: Ensures access to elevated areas safely.
- Shingle Remover/Flat Pry Bar: Used to strip away old shingles and nails during roof replacement projects.
- Tin Snips/Metal Shears: Perfect for cutting metal flashing or gutters.
- Measuring Tape: Ensures precise cuts and spacing during installation.
- Caulk Gun: Applies roofing sealant cleanly on joints or seams.
Additional safety tools include harnesses, non-slip shoes, hard hats, gloves, and protective eyewear.
Key Materials Required
The materials you choose will directly impact your roof’s longevity and performance.
- Options include asphalt (architectural or three-tab), wood shakes, slate tiles, or metal panels.
- A waterproof barrier placed beneath shingles to prevent water infiltration. Common options include felt paper (tar paper) or synthetic underlayment.
- Metal strips placed around vents, chimneys, valleys, and edges to prevent water penetration.
- Enhances attic ventilation by allowing hot air to escape while preventing moisture buildup.
- Metal edging that protects roof edges from water damage by directing rain into gutters.
- Galvanized nails are commonly used since they resist rusting over time.
- Roofing caulk or adhesives help seal gaps on flashing and other vulnerable areas.
- A self-adhering membrane designed to protect against ice dams in cold climates.
Bonus Tip: Preparing for Weather Conditions
Before starting any roofing project: – Check weather forecasts to avoid working in rain or high winds. – Cover exposed areas with tarps if unexpected changes occur during your project timeline.
| Tool/Material | Purpose |
| Roofing Nailer | Efficiently installs shingles |
| Underlayment | Waterproof layer beneath roof surface |
| Flashing | Prevents leaks at vulnerable points |
| Ridge Vent | Improves attic ventilation |
By gathering these critical tools and materials before beginning your work on the roof, you’ll be better prepared to execute your project safely while achieving lasting results.
Essential Tools and Materials Every Roofer Manchester NH Should Have
Having the right tools and materials is crucial for any roofing project, whether you’re a seasoned professional or a DIY enthusiast. Proper preparation not only makes the job easier but also ensures safety, efficiency, and durability. Below is a detailed guide on the essential tools and materials needed for roofing projects.
Tools Required for Roofing Projects
A well-equipped toolkit is indispensable for tackling roofing tasks effectively.
- Roofing Hammer: A specialized tool with a claw for removing nails and a magnetized head to hold nails in place during installation.
- Utility Knife: Necessary for cutting roofing felt, shingles, or other materials cleanly and accurately.
- Roofing Nail Gun: Speeds up the process of securing shingles compared to manual hammering.
- Chalk Line Tool: Used to mark straight lines on your roof, ensuring proper alignment of shingles.
- Pry Bar or Crowbar: Helps remove old shingles, nails, or other debris from your roof surface.
- Measuring Tape: Ensures accurate measurements of your roof area and materials.
- Ladder with Stabilizer: Provides secure access to your roof while minimizing risks.
- Safety Harness and Anchor System: Critical for preventing serious injuries when working at heights.
Additional Tools for Efficiency
- Circular saw (for trimming wood)
- Tin snips (for cutting sheet metal like flashing)
- Magnetic sweeper (to collect stray nails)
| Tool | Primary Use |
| Roofing Hammer | Driving/removing nails |
| Utility Knife | Cutting materials |
| Chalk Line Tool | Drawing straight alignment lines |
| Pry Bar | Removing old shingles |
Materials Needed for Roofing Projects
Choosing high-quality materials ensures that your new roof will last.
- Options include asphalt shingles (three-tab or architectural), wood shakes, slate tiles, or metal panels. Asphalt is the most popular choice due to its affordability and durability.
- This layer provides waterproof protection beneath the shingles. Common options include felt paper and synthetic underlayment.
- Typically made of plywood or oriented strand board (OSB), this forms the base layer onto which all other components are installed.
- Essential for areas prone to leaks such as chimneys, skylights, vents, or valleys.
- Help improve attic ventilation by allowing heat and moisture to escape.
- Ensure that you have corrosion-resistant nails suited to weather conditions in your region.
- Used to secure flashing or patch minor leaks during installation.
Preparing Your Materials Checklist
Sample Checklist:
- [ ] Shingles
- [ ] Underlayment
- [ ] Flashing
- [ ] Safety equipment (harnesses, anchors)
- [ ] Proper tools (nail gun, utility knife)
Proper planning begins with gathering these essentials beforehand so you can avoid unnecessary delays during installation.
Using quality tools and durable materials not only enhances efficiency but also improves long-term results in any roofing project. By investing in proper preparation upfront—both in equipment and resources—you set yourself up for success when installing or replacing a roof system professionally.
Step-by-Step Guide to Roof Installation Manchester NH: Shingling Like a Pro
Shingling a roof is a critical part of ensuring your home stays protected from the elements. Following a systematic approach can help you achieve professional results and extend the lifespan of your roof. Below is a detailed step-by-step guide to shingling your roof effectively.
Preparation Before You Begin
Before starting the shingling process, ensure you are well-prepared with the necessary tools, materials, and safety measures. Proper preparation will save time and minimize potential issues during installation.
- Roofing nail gun or hammer
- Utility knife
- Roofing shovel or pry bar (for tear-offs)
- Chalk line
- Ladder/roof harness for safety
- Measuring tape
- Asphalt shingles (architectural or three-tab)
- Roofing felt or underlayment
- Drip edge
- Roofing nails
- Starter strip shingles
- Non-slip footwear
- Helmet
- Safety goggles
- Harness with anchor points
Step-by-Step Shingling Process
Use this methodical guide to ensure proper installation of shingles.
- Inspect the Roof Deck
– Remove old shingles and any debris if you’re replacing an existing roof. – Ensure that the decking is solid and free of rot or damage. – Replace damaged sections before proceeding. - Install Drip Edge
– Run drip edge flashing along the eaves, securing it with roofing nails about every foot. – This prevents water from seeping under your underlayment and into your decking. - Lay Down Underlayment
– Roll out your chosen roofing underlayment (felt paper or synthetic material) across the deck. – Overlap sections by about six inches to ensure coverage. – Secure it with staples or nails as recommended by the manufacturer.
| Type of Underlayment | Benefits |
| Felt Paper | Affordable, good basic coverage |
| Synthetic | Durable, tear-resistant |
- Install Starter Strip Shingles
– Secure starter strip shingles along the edge of the roof to create a solid foundation for subsequent rows. – Align them carefully to prevent misaligned rows higher up on the roof. - Lay Down the First Row of Shingles
– Begin at one bottom corner using full-sized shingles. – Nail each shingle in place using four nails per strip (or six if specified for high-wind areas). – Follow manufacturer guidelines for nail placement to avoid damaging shingles. - Work Your Way Upward in Rows
– Stagger each new row so seams do not align directly above those in previous rows. – Use a chalk line frequently to maintain straight rows throughout installation.
Pro Tips for Professional Results
- Avoid Overdriving Nails:Ensure nails are flush with but not cutting into shingles to maintain their integrity.
- Check Weather Conditions:Avoid working on days with expected rain or high winds as these can hinder progress and compromise safety.
- Seal Ridge Cap Shingles Carefully:The ridge cap is often exposed to intense weather; make sure it’s securely fastened and properly overlapped.
By following these steps carefully, you can achieve a well-shingled roof that offers long-lasting durability while boosting your home’s curb appeal. Proper planning and adherence to best practices are key components in achieving success when tackling this project like a professional roofer would.
Essential Tips for Roof Replacements Manchester NH: Flashing and Ridge Vent Installation
Proper installation of flashing and ridge vents is essential for maintaining the durability and performance of your roof. These components play a critical role in protecting your home against water infiltration and ensuring adequate attic ventilation. Below, we provide a detailed guide to help you install flashing and ridge vents like a professional.
Why Flashing and Ridge Vents Are Important
- Flashing:Protects vulnerable areas of your roof, such as chimneys, skylights, valleys, and vents, from water penetration.
- Ridge Vents:Allow hot air and moisture to escape from your attic, preventing issues like mold growth and reducing energy costs.
Tools and Materials Needed
Tools: – Hammer – Utility knife – Pry bar – Roofing nails – Caulking gun – Measuring tape – Chalk line – Drill with screwdriver bits
Materials: – Aluminum or galvanized flashing – Ridge vent (compatible with your roofing materials) – Roofing cement or sealant – Roofing shingles (if repairs are necessary)
Step-by-Step Guide to Installing Flashing
- Inspect the area where flashing will be installed (e. g. , valleys, chimneys).
- Remove any old or damaged flashing materials.
- Use metal shears to cut the flashing to fit snugly around features like chimneys or along valleys.
- Ensure you leave enough overlap at seams for effective water resistance.
- Align the flashing tightly against the surface it needs to protect.
- Use a chalk line or measuring tape to ensure accurate placement.
- Nail down one side of the flashing using roofing nails.
- Apply roofing cement along edges for added waterproofing.
- Overlap subsequent pieces by 4–6 inches to create a continuous barrier.
- Check for gaps where water could seep through.
- Smooth out sealant with a caulking gun for a clean finish.
Step-by-Step Guide to Installing Ridge Vent
- Measure along the peak of your roof where you intend to install the ridge vent.
- Use chalk lines as guides for cutting an opening if one doesn’t already exist.
- Remove shingles in this area carefully using a pry bar.
- Cut a slot on both sides of the ridge board (about 1 inch wide per side).
- Center the ridge vent over the opening while ensuring it aligns properly with roofing edges.
- Use nails or screws to fasten the vent securely into place along its length.
- Cover nails with roofing sealant to prevent leaks.
- Reinstall Shingles (If Required):Reattach overlapping shingles around edges of vent openings if they were removed during preparation steps.
Tips for Successful Installation
1) Always work during dry weather conditions when undertaking installations involving adhesives/sealants helpful weatherproof application.
(2) Avoid rushing steps ensuring no misalignments/errors compromise durability.
Double-check measurements prior cutting clearances.
Safety Tips and Best Practices for Roofing Projects
Roofing is a critical component of home maintenance, but it comes with its own set of challenges and risks. Ensuring safety during roofing projects should always be the top priority, whether it’s a simple repair or a complete roof replacement. Below are essential safety tips and best practices to follow to minimize risks and ensure a smooth roofing process.
Wear Proper Personal Protective Equipment (PPE)
Using appropriate personal protective equipment is crucial for preventing injuries when working on a roof.
- Non-slip shoes or boots:These provide better grip, especially when walking on steep or wet surfaces.
- Hard hats:Protect your head from falling debris or accidental bumps.
- Safety harnesses:Essential when working at heights, particularly on sloped roofs.
- Gloves:Reduce the risk of cuts and abrasions when handling materials like shingles or flashing.
- Eye protection:Shields your eyes from dust, flying nails, or other debris.
Plan for Weather Conditions
Weather plays a significant role in roofing safety.
- Avoid working during strong winds, rain, snow, or icy conditions as these greatly increase the risk of slips and falls.
- Check weather forecasts in advance to ensure you have clear skies for your project.
- Be cautious in hot weather; prolonged sun exposure can lead to dehydration and heat exhaustion.
| Weather Condition | Risk | Safety Tip |
| Rain | Slippery surfaces | Wait for dry conditions |
| High winds | Falling objects | Secure tools & materials properly |
| Extreme heat | Heat exhaustion | Stay hydrated; take regular breaks |
Use Proper Equipment
Having the right tools and equipment in good condition makes your work safer and more efficient.
- Use sturdy ladders with locking mechanisms to prevent accidental movement.
- Ensure scaffoldings are stable if they are being used instead of ladders.
- Always inspect power tools (e. g. , nail guns) before using them to ensure they function properly.
Maintain Good Roof Practices
Safe habits on the roof can prevent accidents.
- Keep your workspace clean by removing loose materials that could cause you to trip.
- Avoid overloading any area with too many materials at once—this could compromise structural integrity.
- Never work near edges without proper fall protection systems like guardrails or tie-offs.
Work with a Team When Possible
Roofing projects can often be safer when conducted as part of a team rather than attempting them alone.
- Help hold ladders steady during climbs or descents.
- Pass tools safely instead of requiring you to balance while moving them yourself.
- Monitor your safety while you focus on completing tasks.
Know Emergency Procedures
Understanding what steps to take in case of an emergency is just as important as preventing accidents.
- A first aid kit readily available nearby.
- Contact information for local emergency services saved on your phone or written down somewhere accessible.
- A clear plan for safely exiting the roof in case sudden situations arise (e. g. , weather changes).
By following these safety tips and best practices, roofing projects can be completed efficiently while minimizing risks for everyone involved.
How to Choose Between Architectural and Three-Tab Shingles for Your Roof
When it comes to roofing, selecting the right type of shingles is a significant decision that affects not only the aesthetics of your home but also its durability and value. Two of the most common shingle options are architectural shingles and three-tab shingles. Understanding their differences can help you make an informed choice based on your home’s needs, budget, and style preferences.
Key Features of Architectural Shingles:
– Durability: Due to their multiple layers, architectural shingles tend to have longer lifespans (typically 25–30+ years) compared to three-tab shingles.
– Aesthetic Appeal: Their textured design adds depth and dimension to your roof, boosting curb appeal.
– Wind Resistance: They often have higher wind resistance ratings (up to 110–130 mph).
– Cost: Architectural shingles usually cost more than three-tab options due to their premium materials and performance benefits.
What Are Three-Tab Shingles?
Three-tab shingles are a traditional roofing option known for their simple design and affordability. These shingles have a uniform appearance with cutouts (or “tabs”) along the bottom edge that give them their name.
Key Features of Three-Tab Shingles:
– Affordability:Three-tab shingles are generally less expensive upfront compared to architectural options.
– Lifespan:These shingles typically last around 15–20 years under ideal conditions.
– Lightweight Design:They’re thinner than architectural shingles, which can make them easier for contractors to handle during installation but less durable over time.
– Uniform Appearance:The consistent shape provides a clean, flat look once installed.
Comparing Architectural vs.
| Feature | Architectural Shingles | Three-Tab Shingles |
| Cost | Higher initial cost | Budget-friendly |
| Lifespan | 25–30+ years | 15–20 years |
| Appearance | Textured and dimensional | Flat and uniform |
| Wind Resistance | Up to 110–130 mph | Generally up to 60 mph |
| Weight | Heavier | Lightweight |
Factors to Consider When Choosing
- Budget Constraints: If you’re working with limited funds, three-tab shingles may be the better choice due to their lower upfront cost.
- Durability Needs: For areas prone to high winds or harsh weather conditions, the extra durability of architectural shingles may be worth the investment.
- Aesthetic Preferences: If enhancing your home’s curb appeal is important, architectural shingles offer more visual interest with their dimensional designs.
- Roofing Structure: If your roof has structural limitations in terms of weight-bearing capacity, lighter three-tab shingles could be more suitable.
- Longevity Goals: For long-term value or reduced maintenance needs over time, consider investing in durable architectural materials.
Final Thoughts
Both architectural and three-tab shingles have unique strengths that cater to different roofing needs. By carefully considering factors such as longevity requirements, budget limitations, climate challenges, and aesthetic preferences, you’ll be well-equipped to choose the best option for your home’s roof installation or replacement project.
- Expert Tips for Roof Installation Manchester NH Homeowners Need to Know
- The Importance of Hiring a Professional Roofer Manchester NH for Proper Roof Installation
- Manchester NH roofing: Your Ultimate Guide to Estimating Costs and Materials
- The Ultimate Guide to Manchester NH Roofing Installation and Replacement
- Tips for Choosing the Right Roofing Contractor Manchester NH for Your New Roof Installation
- Step-by-Step Guide to Reshingle a Roof with a Roofing Contractor Manchester NH
- The 8-Step Process for Manchester NH Roofing: Replacing Your Roof from Start to Finish